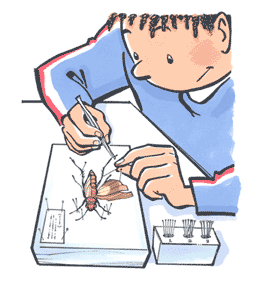
Building an insect collection involves following a specific protocol, methods and materials regarding insect collection and related data, specimen display, species determination and canning. This article, the precedents and the following are therefore intended to present how I proceed.
How to prepare insects once dead?
1) – The material :
Insects, once dead (to kill them, see this article), must be prepared to be then integrated into the collection. For that, before starting, it is necessary to acquire a minimum of specific and indispensable entomological material.
The material consists mainly of
- Pinces, there are different types : soft pliers, thin pliers, thumb to prick
- Hands, several diameters and lengths are necessary according to the size of the insects to prepare. They are referenced by numbers 000, 00 and from 0 to 7
- Paillettes, different sizes for gluing insects
- Etaloir, several models exist, to spread Lepidoptera (butterflies) and Odonates (dragonflies)
- Insect boxes, or also called storage boxes, there are several models in size, construction materials, glazed or not
Other materials can be used, but to start, I think that one is sufficient. Over time, needs may arise, at which point you may acquire new objects.
2) – Spreading :
Spreading consists in giving back to the insect a natural shape for the aesthetic side while making visible the parts of the body used for the determination (wings, antennas and legs). A well prepared collection will be homogeneous, therefore more pleasant to look at and scientifically exploitable. This work requires patience, dexterity and habit. I summarize the broad lines, after free each to find the techniques which suit him best.
caption id=”attachment_887″ align=”alignright” width=”299″] Protocole de placement de l’épingle[/caption]
– 1) The first step is to insert a needle into the insect that will hold and manipulate it afterwards. The needle placement follows a specific protocol (see illustrations). The insect must be placed high enough on the needle to leave space for the labels (see this article).
caption id=”attachment_888″ align=”alignleft” width=”270″] Positionnement de l’épingle[/caption]
If the insect is too small (like flies, ants or other), it is possible to proceed otherwise. It can either be glued on a straw, the size of which depends on the size of the insect, or it can be pinned by a thorough. A minute detail is an extremely fine pin which will then be pricked into a small block of emalene (see photos below)
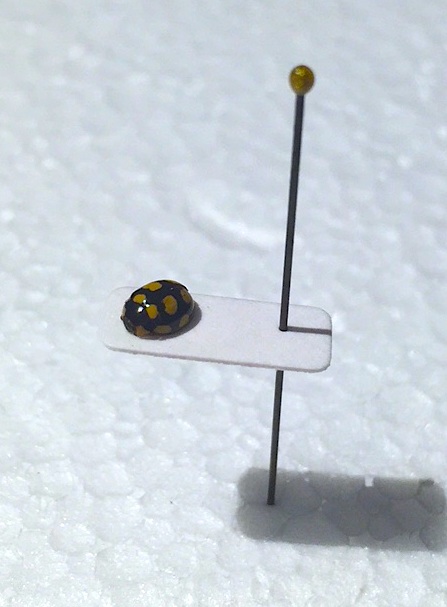
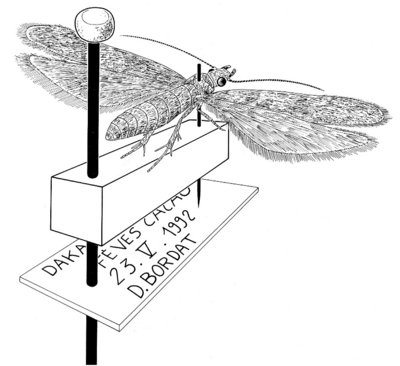
– 2) The second step is the positioning of the different morphological parts of the insect. Each order of insects (butterfly, beetle, dragonfly, cricket) are spread in a very precise and specific way.
Les papillons are the most delicate to spread because of their fragility, especially their wings (composed of scales on their surface). The method, which requires practice, consists in using the stall, where the wings will be fixed and maintained on each side of the groove of the stall by “crystal paper” and needles (see photos below). The wings are placed in the right place with a needle, gently, to avoid damaging it. The line of intersection of the hindwings and forewings must be perpendicular to the axis of the body. The antennas are held by needles. Do not forget to position a piece of cotton under the abdomen of the butterfly to keep it in a horizontal position. This technique is also valid for Odonates.
The Coléoptères are easier, because they are more robust. This involves positioning the legs and antennas to restore the animal’s natural appearance. The antennas will face forward, as well as the front legs, and the 2 pairs of hind legs towards the rear. The different anatomical elements will be held by needles (see photo). If the antennas are long as in Cerambycidae, they can be directed backwards to gain space. If you want to have an open-winged beetle, simply place a block of emalene under the wings and hold them with “crystal paper” and a needle, a technique used in butterflies. However,
The Orthoptera (locusts, grasshoppers and crickets) are spread in the same way as Beetles, sometimes the wings on one side can be spread to allow the observation of certain morphological criteria. For this, the technique is the same as for Beetles.
For other insect orders (Hymenoptera, Neuroptera, Heteroptera…), all of the techniques presented above can be used, as far as possible because of the size of the specimens.
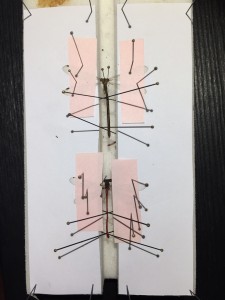
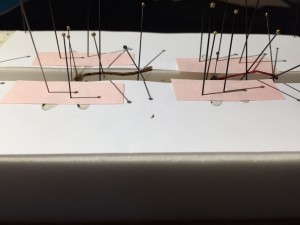
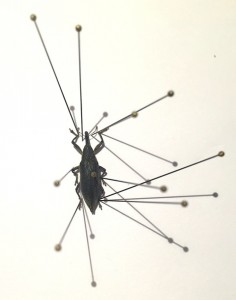
– 3) The third step consists, once the insects have been pinned, in letting them dry, either naturally in a dry place for several days, or in an oven when the conditions are humid. In the first case, insects must be protected from predators and dust. Before removing the needles, make sure that the insects are dry, otherwise, after a few days, the wings, in particular, may drop under gravity. The drying time depends on the size of the insects and the hygrometric conditions of the air and temperature of course.
I am, of course, at your disposal for any questions, requests for advice, tips and/or expertise. Do not hesitate to contact me here. Looking forward to reading and helping you!

